iOS - Reducing Your App’s Size
iOS - Reducing Your App’s Size
Users often avoid downloading apps that seem too large, particularly in emerging markets where devices connect to often-spotty 2G and 3G networks or work on pay-by-the-byte plans. This article describes how to reduce your app’s download size, which enables more users to download your app.
Before you start optimizing your app, you first need to measure its download and installation sizes.
Did you know none of the binaries that you create for debugging or that you upload to the App Store from within Xcode are suitable for measuring your app’s size?
You can’t use any of the following binaries:
- The APP file (the app bundle)
- The XCARCHIVE bundle that you create when your archive your app
- The IPA file that you upload to App Store Connect
Those binaries contain resources and files that aren’t part of the bundles that your users download from the App Store; for example, DSYM files for crash reporting.

Did you know when compared to the binary you uploaded, the final size of your app after it’s approved for the App Store may end up being slightly larger?
This size increase can happen when the App Store performs additional processing on your app’s binaries, adding DRM to prevent app piracy and then recompressing the binaries.
What is the application size specified by the apple cellular download limit?Apple has kept iOS cellular download limit to 200MB
Measuring your app’s size
- Gathering information from App Store Connect
- Create the App Size Report
With the app size report you generate, you will be ready to perform some basic optimizations, such as checking your binaries for unused assets, to reduce the size of your app.
Create the App Size Report
While App Store Connect provides the most accurate measurements of your app’s size, Xcode’s built-in reporting tools can create an app size report for you. It provides close estimates of your app’s download and installation sizes. To create an app size report:
- Archive your app in Xcode.
- Export your archived app as an Ad Hoc, Development, or Enterprise build.
- In the sheet for setting the development distribution options, choose “All compatible device variants” for app thinning, and enable Rebuild from Bitcode.
- Sign your app and export it to your Mac.
This process creates a folder with your app’s artifacts:
- A universal IPA file for older devices. This single IPA file contains assets and binaries for all variants of your app.
- Thinned IPA files for each variant of your app. These files contain assets and binaries for only one variant.
The output folder for your exported app also contains the app size report: a file named App Thinning Size Report.txt. This report lists the compressed and uncompressed sizes for each of your app’s IPA files. The uncompressed size is equivalent to the size of the installed app on the device, and the compressed size is the download size of your app. The following shows the beginning of the app size report for a sample app:

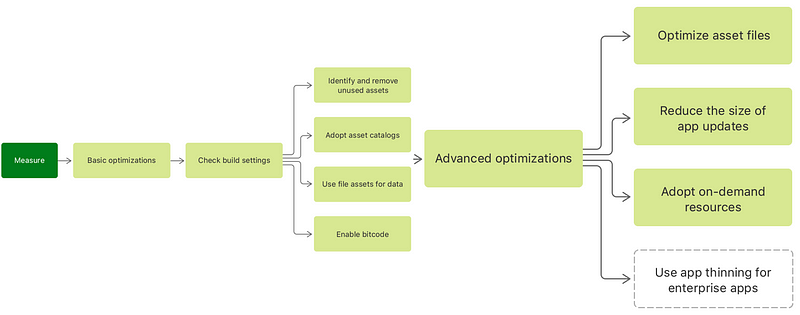
Basic Optimization to Reduce Your App’s Size
1. Check Your Target’s Build Settings for Release Builds
Specify the degree to which the generated code is optimized for speed and binary size.
[-O0]None: Do not optimize. With this setting, the compiler’s goal is to reduce the cost of compilation and to make debugging produce the expected results. Statements are independent — if you stop the program with a breakpoint between statements, you can then assign a new value to any variable or change the program counter to any other statement in the function and get exactly the results you would expect from the source code.
[-O1]Fast: Optimizing compilation takes somewhat more time, and a lot more memory for a large function. With this setting, the compiler tries to reduce code size and execution time, without performing any optimizations that take a great deal of compilation time. In Apple’s compiler, strict aliasing, block reordering, and inter-block scheduling are disabled by default when optimizing.
[-O2 ]Faster: The compiler performs nearly all supported optimizations that do not involve a space-speed tradeoff. With this setting, the compiler does not perform loop unrolling or function inlining, or register renaming. As compared to the `Fast` setting, this setting increases both compilation time and the performance of the generated code.
[-O3]Fastest: Turns on all optimizations specified by the `Faster` setting and also turns on function inlining and register renaming options. This setting may result in a larger binary.
[-Os]Fastest, Smallest: Optimize for size. This setting enables all `Faster` optimizations that do not typically increase code size. It also performs further optimizations designed to reduce code size.
[-Ofast]Fastest, Aggressive Optimizations: This setting enables `Fastest` but also enables aggressive optimizations that may break strict standards compliance but should work well on well-behaved code.
[-Oz]Smallest, Aggressive Size Optimizations: This setting enables additional size savings by isolating repetitive code patterns into a compiler generated function.
2. Identify and Remove Unused Assets
Next, look inside your app’s IPA file to find out if your app contains unused assets or unnecessary files. Make sure you’re not adding your app’s README or not required file to a target, remove any unused image assets and header files, and so on.
3. Adopt Asset Catalogs for Your App’s Resources
Asset catalogs allow Xcode and the App Store to optimize your app’s assets, which can significantly reduce the size of your app. Use asset catalogs instead of putting your assets in your app bundle directly then do the following:
- Tag each asset — for example images, textures, or data assets — with relevant metadata to indicate which devices the asset is for. Doing so maximizes the size reduction that app thinning provides, which can be significant for apps with assets that aren’t required by every device.
- Set the level of compression for each asset type. In particular, for apps using wide color images or textures with Metal, consider the
ASTCcompression options.
4. Use Asset Files for Data that Ships with Your App
As you inspect your app’s IPA file, you may find that your app’s binaries take up a lot of space. If you ship your app with data, consider using asset files instead of putting the data into your code.
For example, use a property list for bundling any data with your app instead of using strings in code. Also, some developers use source code to ship other resources for example, images. Consider using asset files instead, and put them in an asset catalog. Moving data and assets out of your source code and into asset files significantly reduces the size of your app’s binary. It also allows App Store Connect to more efficiently compress your app.
5. Enable Bitcode
Bitcode is an Apple technology that enables you to recompile your app to reduce its size. The recompilation happens when you upload your app to App Store Connect or export it for Ad Hoc, Development, or Enterprise distribution.
Advanced Optimization to Further Reduce Your App’s Size
1. Optimise Your App’s Asset Files
- Use the most efficient image and video format possible Using a more efficient image file format is a good way to reduce your app’s size. For example, consider using the HEIF format for images, and the HEVC format for videos. If you’re using PNG files, consider using 8-bit instead of 32-bit PNGs. Doing so can decrease the image size to a quarter of the original size.
- Compress images For 32-bit images, using Adobe Photoshop’s “Save for Web” feature can reduce the size of JPEG and PNG images considerably.
- Compress audio files As a general rule, compress audio using
AACorMP3codecs, and experiment with a reduced bit rate.
2. Reduce the Size of App Updates
Instead of always downloading the whole app when an update to the app is available, the App Store creates an update package. It compares one or more prior versions of your app to the new version and creates an optimized package. This package contains only the content that has changed between versions of your app, excluding any content that didn’t change.
This comparison looks at everything in the application bundle, including the application executable, storyboards, nibs, localizations, and other assets, like images.
3. Adopt On-Demand Resources
Analyze all of your app’s assets and determine which resources it uses infrequently. Group the infrequently used resources into asset packs. When you upload your app to App Store Connect, asset packs don’t become part of your app’s initial download or app updates. Instead, the app can download them separately as needed.
4. Leverage App Thinning
App thinning is a technology that ensures that an app’s IPA file only contains resources and code that’s necessary to run the app on a particular device. Apps that are available in the App Store, and that you distribute to testers using TestFlight, already leverage app thinning.
Voila!
Now you have all the bullets.
References: https://developer.apple.com/